Collaborating on GitHub
In the first Git module, we learned to work independently with Git repositories on the local command line. In this second part, we will focus on using the GitHub web interface and collaborating with others.
Link a Local Repository to GitHub
Version control really comes into its own when we begin to collaborate with other people. We already have most of the machinery we need to do this; the only thing missing is to copy changes from one repository to another.
Systems like Git allow us to move work between any two repositories. In practice, though, it’s easiest to use one copy as a central hub, and to keep it on the web rather than on someone’s laptop. Most programmers use hosting services like GitHub, Bitbucket, or GitLab to hold those main copies.
Let’s start by sharing the changes we’ve made to our current project with the world. Log in to GitHub, then click on the icon in the top right corner to create a new repository:
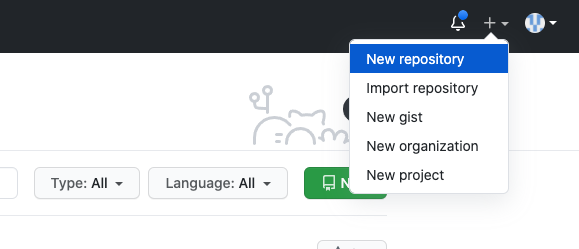
Click ‘New repository’.
As soon as the repository is created, GitHub displays a page with a URL and some
information on how to configure your local repository. Provide a name for your
new repository like python-test (or whatever you want, it doesn’t have to
match the name of your local folder).
Note that our local repository still contains our earlier work on python_test_1.py
and other files, but the remote repository on GitHub doesn’t contain any memory
of python_test_1.py yet. The next step is to connect and sync the two repositories.
We do this by making the GitHub repository a “remote” for the local repository. The
home page of the repository on GitHub includes the string we need to identify it:
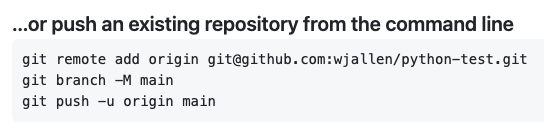
Follow the instructions for pushing an existing repository.
Back on Frontera in the local Git repo, link it to the repo on GitHub and confirm the link was created:
Attention
Make sure to use the URL for your repository instead of the one listed here.
[fta]$ git remote add origin git@github.com:username/python-test.git
[fta]$ git remote -v
origin  git@github.com:username/python-test.git (fetch)
origin  git@github.com:username/python-test.git (push)
The name origin is a local nickname for your remote repository. We could use
something else if we wanted to, but origin is by far the most common choice.
SSH Keys
Another crucial step is to set up SSH keys for authentication. GitHub no longer allows simple username / password authentication from the command line. To set up SSH keys, click on:
Your account => Settings => SSH and GPG keys => New SSH key
In the “Title” box, add a memorable name for this key like “Frontera”. In the “Key” box, cut and paste the contents of your existing public key on Frontera. You can find it by executing the command:
[fta]$ cat ~/.ssh/id_rsa.pub
ssh-rsa AAAAB3NzaC1yc2EAAAADAQABAAABAQDF8crdmqgk2GhRmsLPcREWjzc9zb2B....
........................................................................
If you do not have an existing SSH key, it is easy to make your own. For this workshop, if you must make SSH keys make sure to name them something other than that standard key name so that you do not break anything:
[fta]$ mkdir -p ~/.ssh/ && ssh-keygen -f ~/.ssh/github_rsa -t rsa -b 3072 -N ""
[fta]$ cat ~/.ssh/github_rsa.pub
ssh-rsa AAAAB3NzaC1yc2EAAAADAQABAAABAQDF8crdmqgk2GhRmsLPcREWjzc9zb2B....
........................................................................
If you create your own key with a non-standard key name, one caveat is that you
must configure your system to use this new key when connecting to GitHub. Open
up ~/.ssh/config with your favorite text editor and add the following two lines:
Host github.com
  IdentityFile ~/.ssh/github_rsa
Once the SSH key is set up, this command will push the changes from our local repository to the repository on GitHub:
[fta]$ git branch -M main
[fta]$ git push -u origin main
Warning: Permanently added the ECDSA host key for IP address '140.82.112.4' to the list of known hosts.
Counting objects: 3, done.
Delta compression using up to 8 threads.
Compressing objects: 100% (2/2), done.
Writing objects: 100% (3/3), 223 bytes | 0 bytes/s, done.
Total 3 (delta 0), reused 0 (delta 0)
To git@github.com:username/python-test.git
 * [new branch]      main -> main
Branch main set up to track remote branch main from origin.
Now that the repositories are synced, your development workflow has evolved to
include the git push operation. From here on, if you make changes to your code,
you can expect to follow the changes with the commands:
# Make some edits to "example_file.py"
[fta]$ git status
[fta]$ git add example_file.py
[fta]$ git commit -m "description of changes"
[fta]$ git push
Clone the Repository
Spend a few minutes browsing the web interface for GitHub. Now, anyone can make
a full copy of the python-test repo including all the commit history by performing:
[fta]$ git clone git@github.com:username/python-test.git
Cloning into 'python-test'...
remote: Enumerating objects: 15, done.
remote: Counting objects: 100% (15/15), done.
remote: Compressing objects: 100% (10/10), done.
remote: Total 15 (delta 4), reused 15 (delta 4), pack-reused 0
Unpacking objects: 100% (15/15), done.
If the repository on GitHub gets ahead of your local repository, i.e. it has some changes in it that someone else pushed from somewhere else, or you pushed from a different machine, then you can try to update your local repository to pull the changes back down.
[fta]$ git remote update    # checks to see if there are updates in the remote
[fta]$ git pull             # pulls those updates down to local
Warning
If you have changes in local files that conflict with the remote repository
(i.e. the repository on GitHub), the git pull will fail and you have
found your way into a “merge conflict”.
Good luck!
Git / Version Control Concepts
Let’s take a quick intermission to lean some important definitions (most of these things can easily be managed in the GitHub web interface):
Fork
A fork is a personal copy of another user’s repository that lives on your account. Forks allow you to freely make changes to a project without affecting the original. Forks remain attached to the original, allowing you to submit a pull request to the original’s author to update with your changes. You can also keep your fork up to date by pulling in updates from the original.
Branch
A branch is a parallel version of a repository. It is contained within the repository, but does not affect the primary or main branch allowing you to work freely without disrupting the “live” version. When you’ve made the changes you want to make, you can merge your branch back into the main branch to publish your changes. For more information, see About branches.
Tag
Git has the ability to tag specific points in history as being important. Typically people use this functionality to mark release points (v1.0, and so on).
Pull Request / Merge Request
Pull requests are proposed changes to a repository submitted by a user and accepted or rejected by a repository’s collaborators. Like issues, pull requests each have their own discussion forum. For more information, see About pull requests.
Collaborating with Others
A public platform like GitHub makes it easier than ever to collaborate with others on the content of a repository. You can have as many local copies of a repository as you want, but there is only one “origin” repository - the repository hosted on GitHub. Other repositories may fall behind the origin, or have changes that are ahead of the origin. A common model for juggling multiple repositories where separate individuals are working on different features is the GitFlow model:

GitFlow model
EXERCISE
Let’s work on a branch plus pull request in the GitHub web interface.
Locate and navigate to your repository
Click on the branch / tag navigator near the top right and start typing in a new name to create a new branch
By default, it should switch you to the new branch. Click on one of your files and edit it (e.g. add a comment) directly in the web interface
Navigate to the “Pull requests” tab and click on “New pull request”
Make sure to select the original branch “main” as the base, and your new branch as the downstream for comparison
Review the code changes and make everything is as expected before choosing “Create pull request”
Now the owner of the repository (you) can accept the pull request, merging the edits into the main branch
What are the differences between a “merge commit”, “squash and merge”, and “rebase and merge”? The differences are subtle. All will result in the edits getting merged into the main branch. It is mostly a stylistic thing, and the best method depends on whatever the rest of developers agree to use. More info on the differences here.
EXERCISE
Let’s next work on a fork plus pull request in the GitHub web interface.
Navigate to this repository: https://github.com/wjallen/coe-332-forking-demo
Click the “Fork” button near the top right and fork it to your own user space
Now you could either
git cloneyour fork to the class server, put in a new file, thengit add=>git commit=>git push; OR you could click “Add file” in the GitHub web interface and create a new file that wayNavigate again to the “Pull requests” tab and click to create a “New pull request”
Make sure the original repo (
wjallen) is set as the base and your fork is set as the headCreate the pull request and provide enough detail for the repository owner (
wjallen) to know whether he should accept your pull request or not
Consult the documentation in the base repository (if documentation exists) and look out for general guidance for contributors. If you develop a new feature and it is merged back into the base, you can generally just delete your fork.
Other Considerations
Most repos will also contain a few standard files in the top directory, including:
README.md: The landing page of your repository on GitHub will display the contents of README.md, if it exists. This is a good place to describe your project and list the appropriate citations.
LICENSE.txt: See if your repository needs a license.
.gitignore: Tells Git which files and directories to ignore when you make a commit.
Summing Up
To summarize the second Git module, the important new commands we covered were:
git branch         # Get and set repository or global options
git push           # Create an empty Git repository or reinitialize an existing one
git clone          # Clone a repository into a new directory
git remote update  # Look for changes in a remote repository
git pull           # Fetch from remote repository and merge into local
The key takeaway is that the general workflow has now evolved to include a remote repository up on the web (i.e. GitHub). Make changes locally, and frequently push them to GitHub:
git add=>git commit=>git push
If collaborating with others or working between multiple devices, you will find that you often need to pull changes from the web back down to your local repository:
git remote update=>git pull
There are many other commands that can be discovered with git --help. Additional
help on a specific git command can be found with git COMMAND --help.
Additional Resources
Some of the materials in this module were based on Software Carpentry DOI: 10.5281/zenodo.57467.